Submitted by Sara on 12 March 2009 - 7:27pm
Designer:
Crawford, Patricia
Folder:
Adams, Sara
Difficulty Level:
Intermediate
Model type:
Objects
Paper ratio:
Square
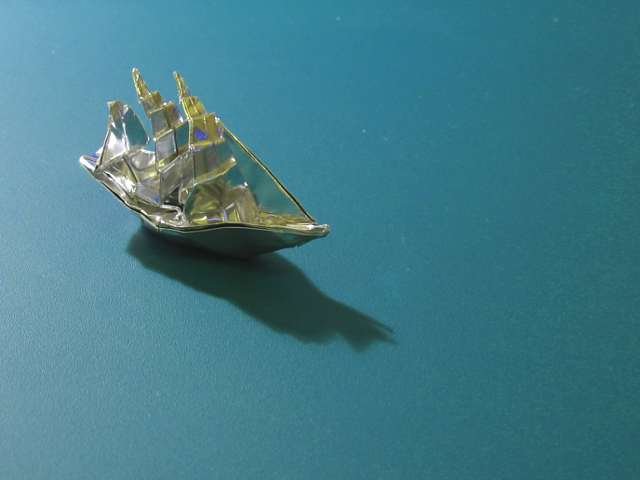
I think this is an amazing model given that it was designed quite a while back. The book was first published in 1974, so the model must be at least as early as that.
Paper: 15cm square of foil-paper-foil
Model: 6cm length, 4cm height, 2cm width
Comments
Submitted by Daniel (not verified) on 13 March 2009 - 12:08am Permalink
WOW!
Wow, the ship has a nice effect when you used foil. It kind of looks like as if the ship was made of silver.
Submitted by Sara on 14 March 2009 - 10:47am Permalink
Unforutately no colour-change effect
Yes, but unfortunately you can't see the nice colour-change effect. With duo paper the sails are a different colour than the body of the ship. I folded this one for a friend, who wanted it in silver throughout. And it does have something to it.
-- Sara
Submitted by Daniel (not verified) on 24 March 2009 - 3:10am Permalink
i wonder...
Have you ever tried to make it with aluminum foil? I tried to make a model by Jeremy Shafer by using aluminum foil, but sadly, it failed.
Submitted by Sara on 30 March 2009 - 11:57am Permalink
Not tried, probably never will
No, I haven't. But I'm quite sure it would be very hard to do. I already had problems with this foil-paper mix ripping during some of the steps (esp. the colour change ones).
Submitted by Ancella (not verified) on 15 March 2009 - 12:06am Permalink
Simply Astounding!!
Hi Sara, this model is really great! And it has a lot of detail involved in it too...
How long did it take you to fold this model?
Submitted by Sara on 16 March 2009 - 3:09pm Permalink
A bit less than an hour
I find folding with foil quite challenging, it rips so easily. So every fold has to be done very carefully. That's why it took me about 45 minutes or so to complete.
Submitted by Spoonfed (not verified) on 1 May 2009 - 3:31pm Permalink
Amazing!
Wow that's really impressive! Thank you so much for sharing it.
Submitted by Anonymous (not verified) on 25 June 2009 - 8:08pm Permalink
I need help
i have the origami book, and i'm trying to make the ship for my boyfriend for our anniversery but the book doesn't show the steps very well. i've done step 1 but i can't get from 2 to 3. It shows the mountains and the valley folds but that hardly helped.
Submitted by Sara on 26 June 2009 - 7:20am Permalink
Some help for step 2 (collapse everything)
First check that on each corner of the square the paper (white side up) are in place as follows:
(a) The 45 degree angle is a mountain fold (that's the main diagonal of the square).
(b) The 22.5 degree angles are valley folds (the creases created during the petal fold of the bird base).
(c) The crease that's perpendicular to the main diagonal is a valley fold.
(d) The two last small creases (22.5 degree to d) are mountain folds.
In the collapse step you will hide the triangle that's outlined by the (c) and (d) creases. Just concentrate on one corner for now.
First fold in the (b) creases. The model will not lie flat.
Fold in the (c) crease.
Make a rabbit ear on the long point by folding the (a) crease.
Collapse the triangle that's located at the centre of the paper - like in an open sink. The three points of the triangle are: the centre of the square, the end points of crease (c).
To flatten the model push everything together. A small portion of the main diagonal (mountain folds) needs to be reversed to a valley fold here. This will probably happen naturally (by the pressure of the paper), but you can also change the direction of the crease.
Repeat these steps for the other three corners. Step 2 is done!
Hope this helps,
-- Sara
Submitted by Anonymous (not verified) on 26 June 2009 - 10:04pm Permalink
thanks
I'm trying really hard to get it, i've been working on just that step for 3 days and it's not getting any clearer. So I think i'm giving up on this one. I understand which ones are valley & mountain folds but it's hard to put it all together. I need diagrams to guide me through it. I've been searching online for more steps or a video to help but this is all I found. It's just frustrating because it's so cool and I know he would love it. But thanks anyway.
Submitted by Sara on 27 June 2009 - 7:04am Permalink
Too bad
Sorry to hear it didn't help. I did make a video on the model, but I didn't succeed in contacting Patricia Crawford, so it's not available after all. :(
-- Sara
Submitted by Anonymous (not verified) on 8 August 2009 - 6:36pm Permalink
Patricia Crawford
Sara -
You might try contacting Boaz Shuval about his insight in contacting Crawford. I believe that he may have contacting her in the past, and I believe that he wrote a paper about her designs, submitted to the JOAS Magazine.
HTH,
Hank Simon
Submitted by Anonymous (not verified) on 11 July 2010 - 6:21am Permalink
i too am having a hard time
i too am having a hard time getting past step 3. i think i got my figure to resemble step 4 but then there's no flap to open it to get to step 5.
other origami diagrams are ok enough to follow, whether the project is easy or intermediate or difficult. im sure ms. crawford wouldn't mind having her full-rigged ship diagram redrawn again just so it'll be easier for slow peeps like me, and everyone can have a stab at making it. otherwise, only the really gifted will get it and then it'll just be an exclusive secret or something. unless that's really the goal. i did read the introduction on the book to get to know the folds and terms, but alas, i'm still lost.
and i would have wanted that girl who wanted to give her boyfriend an origami succeed in time for the boyfriend's birthday.
it seems kinda ironic that the book is titled step by step origami, when i can't get past step 3.
:(
someone help pls?
Submitted by Anonymous (not verified) on 10 July 2009 - 1:56am Permalink
Taurus
Hello Boys and girls !
1) i´m spanish , I´m studing english in this moment. I ask for pardon for writing so badly.
2) Its possible, to to record a video, also I have problems with this book, thanks
Later I explain it in Spanish
traducciñon al castellano:
1 ) soy español, estoy estudiando ingles en este momento, perdon por escribir tan mal.
2) es posible que se pueda grabar un video, yo tambien tengo problemas con el libro, gracias.
Add new comment