Submitted by Sara on 10 February 2009 - 9:33pm
Designer:
Gjerde, Eric
Folder:
Adams, Sara
Difficulty Level:
Low intermediate
Model type:
Square Grid
Tessellations and Fractals
Paper ratio:
Square
Review of the paper used:
Guess what the newest addition to my small origami library is? Yes, indeed! Finally, there's a book on tessellations! I received the book yesterday, and have keenly explored it. And: it is fantastic. I'll look into making a video on some tessellation techniques in the future. Many thanks to Eric Gjerde for making such a fantastic book on an area that really needed a good book on it.
Paper: 19.5cm square of transparent paper
Model: 12.5cm x 12.5cm
Comments
Submitted by Daniel (not verified) on 11 February 2009 - 5:18pm Permalink
hmm.
I don't know about you, but it kind of looks like(a) halves of butterflies from the tessellation, Crowding Butterflies and (b) Cloverfolding tessellation.
Submitted by Anonymous (not verified) on 15 March 2009 - 11:57pm Permalink
Please?
Could you please make a video on how to make this........................................please?
Thank you
p.s......................................Please?
Submitted by Sara on 16 March 2009 - 11:38pm Permalink
Maybe this summer?
I think I will do some tessellation videos in the future, but I'm not sure when yet. Maybe this summer?
-- Sara
Submitted by Anonymous (not verified) on 22 May 2010 - 9:03am Permalink
any further details or advice
any further details or advice for this model?i'm about to try it out
Submitted by Sara on 24 May 2010 - 4:37pm Permalink
Give it a go
It's probably the easiest model to fold from the book, and a good starting point. I think you can use standard paper, e.g. a 15cm / 6in square of kami.
-- Sara
Submitted by Anonymous (not verified) on 27 May 2010 - 11:03am Permalink
thxs
thanks.as i don't have the diagrams(i just know how to fold it since it only uses one method),could you please tell me what by what square grid should i use
Submitted by Sara on 28 May 2010 - 8:31am Permalink
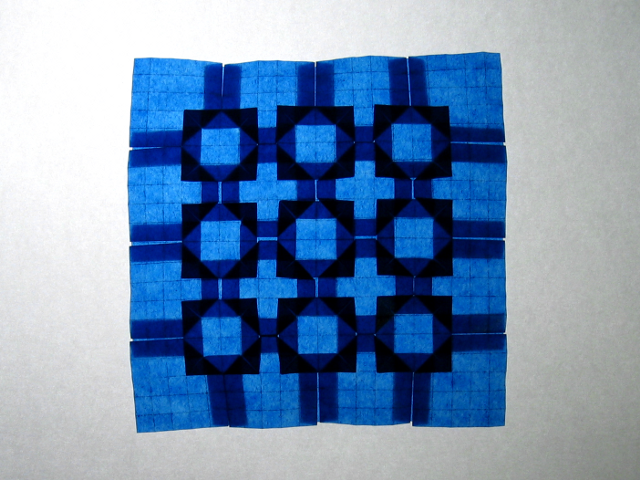
Look at the picture
Actually, you can count the number of divisions I used from this photo. :)
-- Sara
Submitted by Alex (not verified) on 5 April 2011 - 6:16pm Permalink
Nice
Let me guess... you used pergamyn? Also, I have noticed something very strange. I tried to count how many squares you had and I got a 26 by 26 grid. Did you use the ruler?
Submitted by Sara on 6 April 2011 - 6:07am Permalink
Counting the grid
When I count, I get 32. :)
Try counting this way on the edge: every light area is just one layer of paper, every dark area is three layers of paper. On the edge, there are 6 squares that are dark, and 14 areas that are light. 6*3 + 14 = 32
I am guessing you counted the darker areas as two layers, but think about it this way: if only two layers are on top of each other the paper will run into a different direction than when there are three layers on top of each other.
For example, take an uncreased square. The left corner, let's call it A, points to the bottom left. And the right corner, let's call it B, points to the bottom right.
Now fold the paper in half, folding B onto A. This means A does not move, and the direction is the same as before. But B now is both in a different position and points into a different direction: bottom left. Now fold the top layer to the closed edge. Again, B moves and changes direction, now again pointing to the bottom right.
In general, when you have an even number of layers the corners will point into a different direction than when there are an odd number of layers (with all parallel creases, that is).
Now in you usually want to keep your sheet in the same direction, but only add some pattern on top of it. This is why you'll usually see odd numbers of layers, not even numbers of layers.
Makes sense? :)
-- Sara
Submitted by Alex (not verified) on 6 April 2011 - 10:42am Permalink
Yes, thank you. It makes a
Yes, thank you. It makes a lot of sense, but I didn't think about that. Can you please post the CP? I would like to try it.
Submitted by Sara on 6 April 2011 - 12:59pm Permalink
Sorry, no
Eric Gjerde posts some CPs on his website, but not for this one. I'm not sure he'd mind me posting this, but I will err on the safe side. If you do want to have the CP (and much more) I do highly recommend buying the book!
-- Sara
Submitted by Anonymous (not verified) on 20 May 2011 - 12:14am Permalink
Do you know why this model is
Do you know why this model is called 4 and 5?
Submitted by Sara on 21 May 2011 - 8:55am Permalink
Crease pattern
My guess is that the name comes from the crease pattern. The main creases to collapse are always consecutively 5 and then 4 grid squares apart.
-- Sara
Submitted by asherao (not verified) on 5 July 2011 - 7:20am Permalink
Great display
Wow, this is a pretty good one. I had to come here to look at the final picture because I was stuck on one of the steps. Your back lit model helped me out a bunch. Thanks!
-asherao
Submitted by Edward Holmes (not verified) on 19 May 2013 - 11:50am Permalink
Wonderful!
Hi Sara, What a wonderful model! I have just bought the same book I believe. It's called "Origami Tessellations - Awe-Inspiring Geometric Design - Eric Gjerde". Having flicked through, it looks really good. The first tessellation that I folded was one by Tom Hull - Hexagonal Lace Tessellation and I really like it so I wanted to see if I could make some more and stumbled across this book. When I get the chance I will definitely be making some of the models.
Add new comment