Submitted by Sara on 8 June 2009 - 2:17pm
Designer:
Fujimoto, Shuzo
Folder:
Adams, Sara
Difficulty Level:
Intermediate
Model type:
Square Grid
Tessellations and Fractals
Paper ratio:
Square
Review of the paper used:
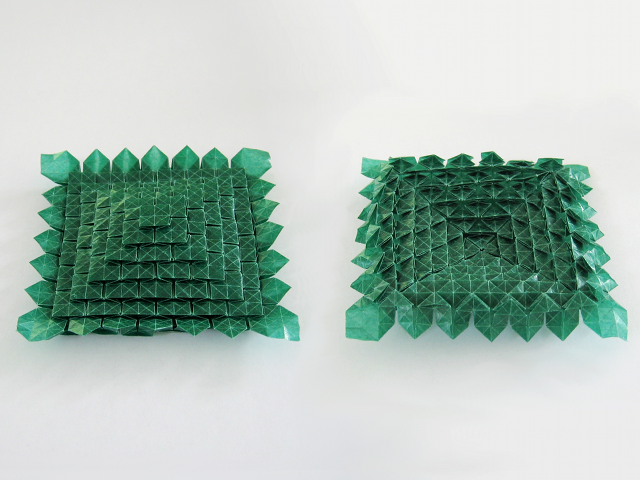
Given that I plan to make a video on a 3-stage clover folding next, I decided I needed to understand the model better. And what better way than to fold a 7-stage clover folding to grasp what it's all about? And this is the result.
Paper size: 19.5cm transparent paper (approx. 7.5in)
Model size: 8.5cm x 8.5cm x 1cm (approx. 3.3in x 3.3in x 0.4in)
The formula for determining which grid to start with depending on how many stages you want to fold is as follows: 6 * (no of stages) - 2
So for a 7-stage tessellation you need a 40-division grid.
Ravi Apte previously compiled this table:
| Stages | Required grid divisions |
|---|---|
| 2 | 10 |
| 3 | 16 |
| 4 | 22 |
| 5 | 28 |
| 6 | 34 |
| 7 | 40 |
| 8 | 46 |
| 9 | 52 |
| 10 | 58 |
| 11 | 64 |
Comments
Submitted by Anonymous (not verified) on 8 June 2009 - 4:50pm Permalink
Samy
Wow !!!
Submitted by Anonymous (not verified) on 25 June 2009 - 7:19pm Permalink
where?
Sara? Where did you find the diagrams for the 3 layered clover folding? i have looked everywhere and i cant find out how to make it. it looks really cool. mabye you could make a video? thanks.
Submitted by Sara on 26 June 2009 - 6:58am Permalink
Video
I plan to make a video on this, if all goes well this weekend.
Submitted by Anonymous (not verified) on 6 October 2009 - 12:33am Permalink
Thanks for the video sara
Thanks for the video sara it's really good like all your other ones, but where did you get the diagrams for this model, and the other two fujimoto models?
Thanks:)
Submitted by Sara on 6 October 2009 - 7:14am Permalink
Diagrams
I learnt this model from Ravi Apte. He had photo diagrams on his website, too, but the website disappeared quite a while ago. Recently (after I made the clover folding video) I got a copy of Oru 4, which includes diagrams to those tessellations, and some variations. Unfortunately, it's not easy to come by that publication.
-- Sara
Submitted by Anonymous (not verified) on 8 June 2009 - 10:43pm Permalink
More levels
hi Sara
i made the clover folding, but, how can i add more levels?
(sorry, my english is bad) (i'm mexican)
Submitted by Sara on 9 June 2009 - 7:54am Permalink
From 3 stages to more
For more stages you have to start with a grid that has more divisions, and therefore more diagonal creases. [I think I might have added double as many diagonal creases than actually necessary. This happens when you experiment...]
You then collapse just like with a 3-stage clover folding. Start from the centre, then do the next iteration of squares as before. The fourth stage is slightly different, but essentially the same. I don't really want to put it in words right now (not that easy to explain), but if you give it a try you'll probably figure it out yourself. That's how I did it, too. Once you know how to fold the fourth stage, it easily generalises to as many stages as you like.
I'll make a video on how to do the 3 stage version, and might also do one on how to make more than 3 stages. It'd just be a small add-on which assumes you already know how to fold 3 stages, but might help those that don't like "fiddling until it works" too much.
Submitted by Anonymous (not verified) on 10 June 2009 - 10:46pm Permalink
Thank you!!!!!
Thank you so much!!!!!
this is my result: http://www.metroflog...
bye
Submitted by Sara on 11 June 2009 - 6:26am Permalink
Way to go
Nice work!
-- Sara
Submitted by Anonymous (not verified) on 2 September 2009 - 6:24pm Permalink
35 or 40 Grid
I'm struggling a bit with the whole concept of the gridding. I find 16 and 64 are quite easy, but how do I go about making a 35 grid? (and for that matter, all others inbetween 16 and 64) I could be missing something really stupid, but I just don't see it yet.
Thanks!
Submitted by Sara on 2 September 2009 - 8:46pm Permalink
Unusual divisions
A 40 by 40 grid is still quite doable - divide into fifths, and then each of the fifths into eights. A 35 by 35 grid is harder, because both 7ths and 5ths aren't straightforward (esp. on small sizes). In general, you can
(a) fold a bigger grid, and then cut down to the grid required, or
(b) measure the divisions that are hard to make.
I usually just try to avoid the too irregular divisions. For example, I'd avoid a 35 by 35 grid, but I'm fine with a 40 by 40 or 48 by 48 grid.
Hope this helps a bit.
Submitted by Anonymous (not verified) on 2 September 2009 - 9:36pm Permalink
Thanks!
Super! Thanks so much!
Submitted by Anonymous (not verified) on 18 June 2010 - 9:49pm Permalink
mountain/valley folds
Does it have to have specific valley/mountain folds or could the whole precreasing be in valley/mountain folds
Submitted by Anonymous (not verified) on 5 September 2009 - 7:23pm Permalink
clover folding
I really appreciate your folding videos, as they are very clear and easy to understand. Could you please do one for folding beyond a 3-stage clover? I would like to know how to create the initial 40x40 (or more) grid and how to add on more levels.
Thank you!
Submitted by Anonymous (not verified) on 11 December 2009 - 9:16pm Permalink
what kind of paper?
what kind of paper did u use? up there it says u used transparent paper, but it looks like almost looks like foil....
Submitted by Sara on 11 December 2009 - 10:16pm Permalink
Pergamyn
I used pergamyn. It's not at all similar to foil.
-- Sara
Submitted by Anonymous (not verified) on 20 April 2010 - 1:35pm Permalink
Where did you learn this and
Where did you learn this and the hydrangea?
Submitted by Sara on 20 April 2010 - 4:35pm Permalink
Where I learned the models
I initially learned these models from photo diagrams Ravi Apte had posted. Unfortunately, his old website, which included those diagrams, doesn't exist anymore. I also "learned" how to fold one of the models in a convention workshop that Ravi lead. He introduced a different folding sequence than his photos showed, but I don't remember it. I decided back then that the method I already knew was nicer. ;)
-- Sara
Submitted by Anonymous (not verified) on 24 June 2010 - 9:23pm Permalink
3 stage folding video
I successfully did a 3 stage folding thanks to your video :) Now I have to find out the courage to take up the 7 (or at least 5) stage folding!
Thanks for all the wonderful videos. I have been following them for quite some time and have made hydrangea and crowding butterflies almost 2 yrs back following your videos in youtube.
Cheers,
-Priti
Submitted by Anonymous (not verified) on 15 July 2010 - 3:44am Permalink
grids
do those grids mean both square and diagonals folds?
Submitted by Sara on 15 July 2010 - 8:08pm Permalink
Square grid
The numbers apply to the horizontal/vertical grid divisions you'll want to start with, i.e. the square grid. I think I've always added all diagonal folds, although not all of them might be necessary.
-- Sara
Submitted by Anonymous (not verified) on 26 August 2010 - 9:36am Permalink
How to do grids
I understand bisecting 4, 8, 16, 32, 64 grids, but how do you fold a 40 grid without drawing all the grid lines? I just bought Eric Gjerde's Origami Tessellations book and he seems to stay with 32 to 64 grids, but you must have a technique you could share?... I can cut my 32 grid down to 28 to make the 5 stage clover but what if I want 34 or 40 grids. Thanks!
Submitted by Anonymous (not verified) on 26 August 2010 - 9:41am Permalink
Sorry
I was so excited about my new book I didn't read further in your posting!!! You were very kind to explain the 40 grids, but i'd love to see a video showing at least a fourth stage! You're are so very talented and are a huge inspiration to my advancing technique. Thanks Sara!!!!
Submitted by Sara on 26 August 2010 - 10:22am Permalink
Vague plans, but not sure when
Well, I had thought about showing a 4th stage because people seem to struggle with it. Right now I fear I have other videos in mind first. However, I would like to make a small add-on video showing how to make more stages. Maybe I could speed over the parts that are already explained in the 3-stage version to make it shorter.
-- Sara
Submitted by Origami Guy (not verified) on 10 October 2010 - 2:09am Permalink
did the math
i did the math and 70 grid would make a 12 stage, a 77 grid would make a 13 stage, and so on!
Submitted by Origami Guy (not verified) on 10 October 2010 - 6:37pm Permalink
oops
i met to say 76 grid would make a 13 stage
Submitted by dave (not verified) on 10 December 2010 - 11:53pm Permalink
32 grid
does a 32 grid work for this?
Submitted by Sara on 11 December 2010 - 3:28am Permalink
5 stages
You can fold 5 stages from a 32 grid. It only requires a 28 grid, so you'll have some paper left to finish the model differently.
-- Sara
Submitted by dave (not verified) on 11 December 2010 - 11:11pm Permalink
stage 5 clover folding question
okay so heres what my paper looks like: on colored side(front) there is 1 square then 4 squares under that with 4 strips of paper coming out inbetween the squares, and squares under the strips. on white side(back) there are 8 strips of paper(2 on left, 2 on right, 2 on top, 2 on bottom). and 4 squares under them( 1 on bottom left, 1 on bottom right, 1 on top left, 1 on top right). in the middle there are 4 triangles pointing inward. what do i do now?
Submitted by Sara on 12 December 2010 - 8:44am Permalink
A photo?
Can you send me a picture, or upload it to the internet and share a link here? My email address is sara@happyfolding.com
-- Sara
Submitted by Anonymous (not verified) on 9 February 2011 - 9:18pm Permalink
more stages
if I want to make more stages i have just too make a bigger grid?(sorry if i make some mistakes i'm still learning
Submitted by Anonymous (not verified) on 11 July 2011 - 11:46am Permalink
7 stage clover folding
hi Sara
your youtube channel is awesome can you please send me a diagram of the pre-creased grid for a 7 stage clover folding via email
thanks
Add new comment